Few months ago I started to write technical articles about Kubernetes and Java development. The feedback that I had was really positive, and I decided to complete the argument talking about how to create a Kubernetes cluster to deploy our applications in the Cloud. This article aims to complement the study addressed in the previous two articles ( From Microservices to Kubernetes with Quarkus (1/2) and From Microservices to Kubernetes with Quarkus (2/2) - Monitoring in which I have demonstrated how to develop a java application, build the docker image and deploy it on a local Kubernetes instance. The missing step was to deploy these applications in the Cloud. We will see how it is possible to define a minimal and inexpensive configuration of Azure Kubernetes Service (AKS) to deploy our applications for testing and demo purposes.
Azure Kubernetes Service
Azure Kubernetes Service (AKS) is a free container service that simplifies the deployment, management, and operations of Kubernetes as a fully managed Kubernetes container orchestrator service. AKS is free, you only pay for the agent nodes within your clusters, not for the masters. The master nodes are managed by Azure and don’t need operational work. Using AKS, we pay only the virtual machines, and associated storage and networking resources that we use. For this reason AKS is one of the most efficient and cost-effective container service on the market.
How much it costs?
The Cloud is a very powerful tool but it can be also a complex thing to manage. If it isn’t well managed it can become very expensive. The aims of this article is to show a simple and cheap AKS configuration for testing and demo purposes. Production environment needs different characteristics like high availability, autoscaling, high performance and low latency. This configuration can be a good point of start for our test and can be scaled and improved to meet production requirements.
As anticipated, using AKS we will be billed for only the virtual machines, and associated storage and networking resources consumed. For this reason the main price will come from the node costs. To stay cheap we can choose to use a pay-as-you-go solution in order to create the resources when needed and destroy when we finished our test. In addition, only 1 node can be enough because we don’t need high availability. A bit more complicated is the “vm size”, it’s important to choose a supported size that give us also the opportunity to use the Kubernetes cluster without problems. We need an economical virtual machine that provide a low-cost option for workloads that run at a low to moderate baseline CPU performance. For this reason I suggest choosing the “B2S” instance that has the following characteristics:
| Instance | vCPU | RAM | Temporary storage | Pay as you go |
| B2S | 2 | 4 GiB | 8 GiB | $0.048/hour (price for West Europe region) |
Only for this single node, we will pay 1,152 $/day. This means that if we are quick to make our test and destroy the resources when finished, we can test our application in a real Kubernetes cluster reachable from internet keeping our budget limited.
This is only the price for the single node, we need to consider also other resources like Storage and network that could be billed.
Configure the AKS Cluster
We can create an AKS cluster using Azure Portal, Azure CLI, Azure PowerShell and Azure Resource Manager Templates.
The aims of this article is to create a test environment and experiment Kubernetes features inside Azure. For this reason I decided to use Azure CLI to define a set of commands that can be used to define our architecture-as-code. This will give us the opportunity to:
- create/destroy/recreate the same architecture
- evolve the code and improve it
- use the code as documentation
- reuse the solution or extend it for new projects
- share the code with colleagues or friends.
I suggest you to use the Azure Cloud Shell to launch Azure CLI commands.
If you want, feel free to use a local console from your local machine that is enabled to az commands.
Using architecture-as-code give me the opportunity to share with you the code that I prepared. The complete source are available for my GitHub at the following link: Simple cheap AKS cluster.
Notice that these scripts are optimized for Unix system, by default Azure Cloud Shell start in a Unix system:

First we define the following env vars:
1
2
3
RESOURCE_GROUP=my-aks-test-rg
CLUSTER_NAME=my-cluster-aks
LOCATION=westeurope
You can change the location using one closer to you. After it, we can create the cluster:
1
2
3
4
5
6
7
8
az group create --location $LOCATION --name $RESOURCE_GROUP
az aks create \
    --resource-group $RESOURCE_GROUP \
    --name $CLUSTER_NAME \
    --location $LOCATION \
    --node-count 1 \
    --node-vm-size "Standard_B2s" \
    --generate-ssh-keys
Notice that we specify:
--node-count 1that means that only one node is created ( no good for high availability but good for cheap works like test and demo).--node-vm-size "Standard_B2s"that is the cheapest vm size that can be used as vm node, this helps to save money.
After few minutes (3-5 minutes), the cluster is created and we can configure our kubectl client. If you are using Azure Shell, kubectl is already installed otherwise if you’re using your own environment you need to download kubectl and install it.
The cluster is new and kubectl doesn’t know how to reach it. For this reason we need to configure it:
1
az aks get-credentials --resource-group $RESOURCE_GROUP --name $CLUSTER_NAME
Now that kubectl has the credentials for this new cluster, we send commands to it:
1
2
3
> kubectl get node
NAME                                STATUS   ROLES   AGE     VERSION
aks-nodepool1-73989958-vmss000000   Ready    agent   4m51s   v1.19.9
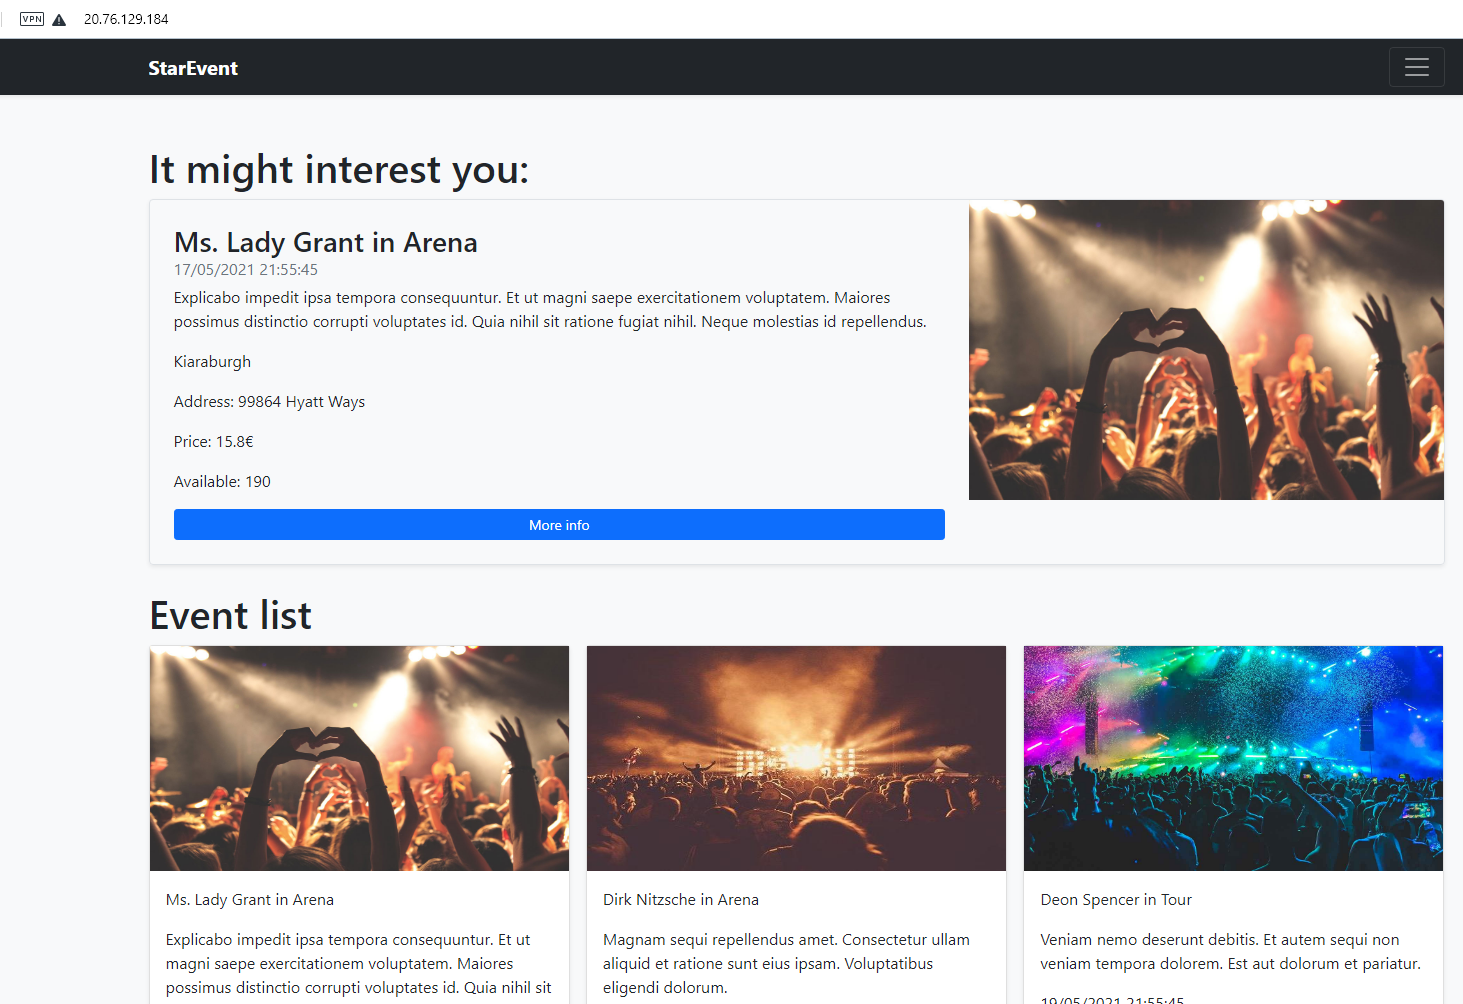
Deploy the application
The application that I will show is the same used in my article: From Microservices to Kubernetes with Quarkus.
Notice that it isn’t important which application you install, you can change this step and deploy your own application.
Here I prepared the application.yaml file that specify the application and configure the Kubernetes objects.
1
2
wget https://raw.githubusercontent.com/marcelloraffaele/azure-experiments/main/simple-cheap-aks-cluster/application.yaml
kubectl apply -f application.yaml
The application will be quickly installed and you can check the objects:
1
2
3
4
5
6
7
8
9
10
11
12
13
14
15
16
17
18
> kubectl get pod
NAME                                     READY   STATUS    RESTARTS   AGE
starevent-event-6d8dd764b9-lnnkx         1/1     Running   0          44s
starevent-frontend-68cdb7b557-tgr4m      1/1     Running   0          44s
starevent-reservation-7f4b94b4c7-2cp2p   1/1     Running   0          44s

> kubectl get deployments
NAME                    READY   UP-TO-DATE   AVAILABLE   AGE
starevent-event         1/1     1            1           79s
starevent-frontend      1/1     1            1           79s
starevent-reservation   1/1     1            1           79s

> kubectl get services
NAME                    TYPE           CLUSTER-IP    EXTERNAL-IP     PORT(S)        AGE
kubernetes              ClusterIP      10.0.0.1      <none>          443/TCP        8m55s
starevent-event         ClusterIP      10.0.14.57    <none>          8081/TCP       94s
starevent-frontend      LoadBalancer   10.0.61.251   20.76.129.184   80:30071/TCP   94s
starevent-reservation   ClusterIP      10.0.34.148   <none>          8082/TCP       94s
Notice that as service, there is also a LoadBalancer that specify an EXTERNAL-IP that can be used to visualize the application frontend.
This is something that is not possible to show using a local Kubernetes cluster. Using a Azure AKS, the kubernetes engine can configure the service and expose the web application to the world in few minutes.
This is a powerful feature but is also the reason because we must be careful to expose data and port to the internet( not only in production environment ) every time we deploy something in the Cloud.
Undeploy the application
When we finish our test we can delete the application and all the object it has created.
1
kubectl delete -f application.yaml
Notice that deleting the application doesn’t stop the cluster that is still running ( you’re still billed for it ).
Delete the cluster
There are two ways to delete the cluster, one is to send a az aks delete command; another is to simply delete the entire resource group using the following command:
1
az group delete --resource-group $RESOURCE_GROUP --yes --no-wait
This will delete the resource group and you will not be billed any more for this cluster.
Notice that your kubectl is still configured with the credentials of this cluster, to clear it:
1
2
kubectl config delete-context $CLUSTER_NAME
kubectl config delete-cluster $CLUSTER_NAME
Cost analysis
Using this configuration and keeping running the cluster for 2 hours, I spent $0,17 (~0,15€):
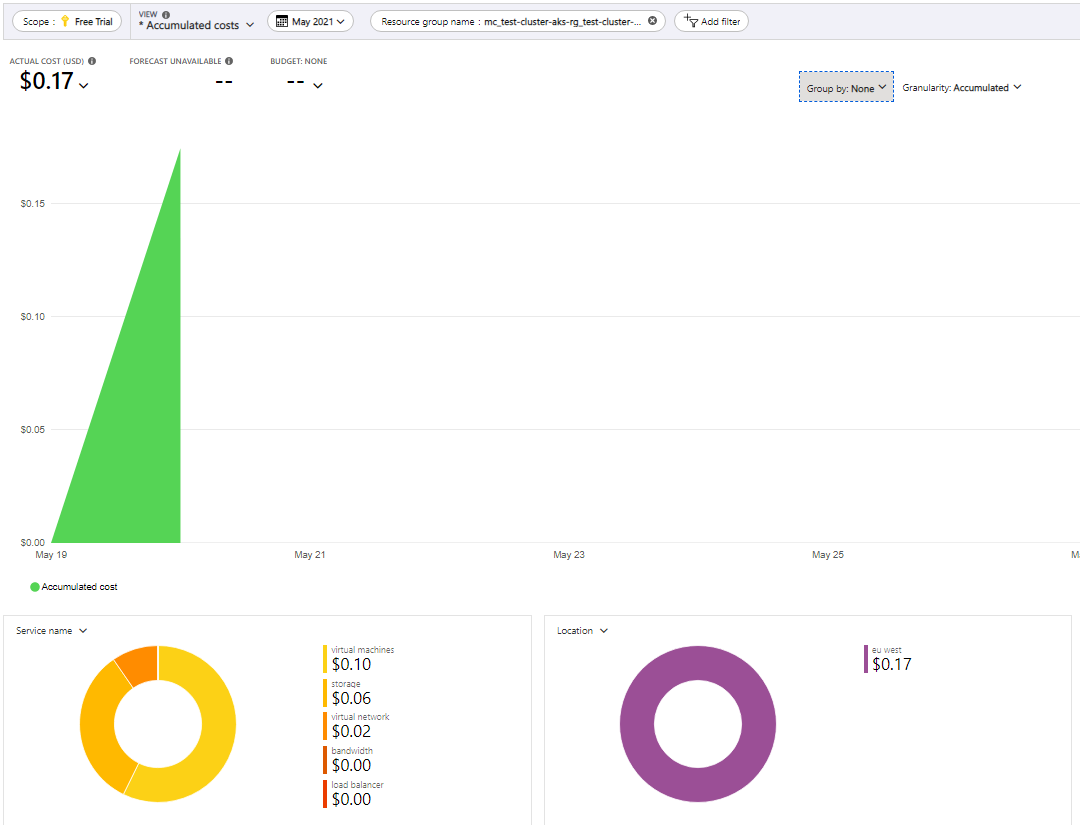
Notice that the image shows also the costs of each service. Even if the experiment was short and not expensive, we can see that the total cost doesn’t depend only on Virtual Machines but also on Storage and Network.
Conclusion
This article wants to demonstrate how it is simple to create a basic configuration of an Azure Kubernetes Service keeping price to minimum. This is the result of my experiment that I hope will be useful to help passionate people like me to create test environment and make other experiments that will be shared. Of course for production purpose the architecture become more complex and also costs are different from these (Reference AKS architectures). Carrying out tests directly on the cloud allows not only to verify the application in a real environment but also to implement and verify integration with other Cloud services. Experimentation is essential to create solid and quality applications in a short time.
Resources
If you want to learn more: