After some days spent reading books about Microservices and Cloud Native I found in Quarkus an impressive stack to build Cloud Native Applications.
From quarkus.io web site, Quarkus is defined as “A Kubernetes Native Java stack tailored for OpenJDK HotSpot and GraalVM, crafted from the best of breed Java libraries and standards”. In Quarkus the Cloud Native approach is crucial and it’s possible to build native container images that give the opportunity to reduce boot time, incredibly low RSS memory (not just heap size!) offering near instant scale up and high density memory utilization in container orchestration platforms like Kubernetes. Quarkus provides a simple and fun to use, full-stack framework by leveraging a growing list of over fifty best-of-breed libraries. The Quarkus programming model builds on top of proven standards such as dependency injection solution based on CDI, JAX-RS annotations to define the REST endpoints, JPA annotations to map your persistent entities and JTA annotations to declare the transaction boundaries, Eclipse MicroProfile to configure and monitor your application, Vert.x, Apache Camel and much more.
This article is the first in a series of articles in which we will see from the developer’s point of view how to develop using Quarkus a microservices-based application from scratch to deploy in kubernetes. The application proposed is a simple use case of a web application for the management of events related to concerts that I have called “starevent”. Development code is publicly available from github repository: https://github.com/marcelloraffaele/starevent-quarkus. The development has been divided into branches each article has its own branch, this article has the “b1.0-rest” as it will address the development of the basic architecture, the REST services and an example of web application that will be used as a frontend. The github code for this article is at the repository: https://github.com/marcelloraffaele/starevent-quarkus/tree/b1.0-rest
Application design
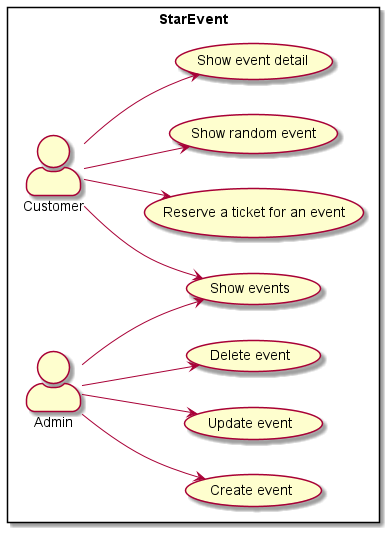
The application is a simplified version of an event booking system. Let’s imagine we want to book a ticket for a concert, we would like to visit a website, see the concert list, choose our concert and reserve a ticket. We can identify two types of users:
- Admin: manages the available events
- Customer: consult the events and buy tickets.
The application could be composed of two microservices that act as backend and deal respectively with the management of events and reservations. Furthermore, to complete the example, we can also provide a frontend to use the entire application.
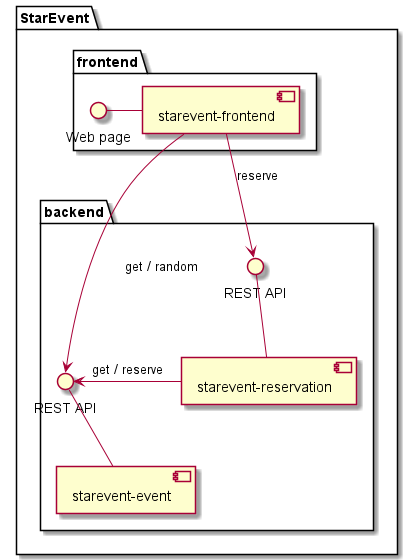
The above diagram shows the component names and expected interactions.
- “starevent-event” provides services for event management (Create, Read, Update, and Delete)
- “starevent-reservation” provides services for consulting reservations and creating new reservations by interacting with “starevent-event” to decrease the availability of seats in the event.
- “starevent-frontend” uses the services exposed by both backend services.
There are no database interactions in the diagram as they will be implemented in the next article.
Project creation
Each microservice must be independent from the others so they can be seen as separate entities. It must be possible at any time to replace each microservice with a new implementation in another language, with another version of the libraries as long as the communication protocol is respected.
Quarkus is fully integrated with Maven and Gradle and provides a number of plugins that help the developer in all stages of development. This article will be based on Maven. Using the “quarkus-maven-plugin” the developer have opportunity to start the development from a initialized project structure. Let’s create the maven project for our designed components:
mvn io.quarkus:quarkus-maven-plugin:1.10.5.Final:create "-DplatformVersion=1.10.5.Final" "-DprojectGroupId=com.rmarcello.starevent" "-DprojectArtifactId=starevent-event" "-DprojectVersion=1.0.0-SNAPSHOT" "-DclassName=com.rmarcello.starevent.EventResource" "-Dpath=/api/events" "-Dextensions=resteasy-jsonb, hibernate-validator"

mvn io.quarkus:quarkus-maven-plugin:1.10.5.Final:create "-DplatformVersion=1.10.5.Final" "-DprojectGroupId=com.rmarcello.starevent" "-DprojectArtifactId=starevent-reservation" "-DprojectVersion=1.0.0-SNAPSHOT" "-DclassName=com.rmarcello.starevent.ReservationResource" "-Dpath=/api/reservation" "-Dextensions=resteasy-jsonb, hibernate-validator, rest-client"

mvn io.quarkus:quarkus-maven-plugin:1.10.5.Final:create "-DplatformVersion=1.10.5.Final" "-DprojectGroupId=com.rmarcello.starevent" "-DprojectArtifactId=starevent-frontend" "-DprojectVersion=1.0.0-SNAPSHOT" "-Dextensions=resteasy-qute, rest-client"
Notice that the Quarkus version used for this example will be 1.10.5.Final as it is the latest version available at this time. Furthermore, according to the commands defined above, the starevent-event and starevent-reservation projects use the “resteasy-jsonb” extension as we need to implement the two REST services:
- /api/events implemented by the EventResource class
- /api/reservation implemented by the ReservationResource class.
Finally the maven project starevent-frontend use the “resteasy-qute” extension that is a template engine designed specifically to meet the Quarkus needs. It’s still in experimental mode but for this use case can be a good opportunity to test it.
Development
This is the funniest part. Quarkus provides a mode called “live coding” that allows you to start the application using the command:
mvn compile quarkus:devand every code change will be quickly be ready in the application without need to manually rebuild the application. This feature is one of the most popular as it allows you to optimize development times.
Configuration files
By default, Quarkus reads the application.properties file from the folder “src/main/resources/”. We can use this file to configure quarqus libraries and for our application properties.
If we start more than one poject with default configurations we could get an error because the Quarkus defaul listening port is 8080. For this reason we must define the listening port of each service. We can choose the following ports:
- starevent-frontend: 8080
- starevent-event: 8081
- starevent-reservation: 8082
In addition we will enable CORS in this way the frontend can access the services content from different domain.
We can change this configuration modifying the application.properties file.
- the starevent-event application.properties file
quarkus.http.port=8081
quarkus.http.test-port=9001
quarkus.http.cors=true- the starevent-reservation application.properties file
quarkus.http.port=8082
quarkus.http.test-port=9002
quarkus.http.cors=true
we don’t need changes in starevent-frontend application.properties file because will start on default port.
The EventResource class
Let’s start defining the implementation of the EventResource class. It implements all the services related to the “event” resource. The source code starts specifing that it consumes requests and produce responses using json format for the path “/api/events”. Behind the scenes Quarkus implements this job using the resteasy-jsonb libraries that we specified as extension during project creation. Inside the class, we can see that it uses the injected instance of EventService class. In this way there’s a separation between REST service and business logic.
@Produces(MediaType.APPLICATION_JSON)
@Consumes(MediaType.APPLICATION_JSON)
@Path("/api/events")
public class EventResource {

    @Inject
    EventService service;

    @GET
    public Response all() {
        List<Event> allEvents = service.getAllActiveEvents();
        return Response.ok(allEvents).build();
    }

    @GET
    @Path("/random")
    public Response getRandomEvent() {
        Event e = service.getRandomEvent();
        return Response.ok(e).build();
    }

    @GET
    @Path("/{id}")
    public Response getEvent( @PathParam("id") Long id) {
        Optional<Event> event = service.getEventById(id);
        if (event.isPresent()) {
            return Response.ok(event).build();
        } else {
            return Response.status(Status.NOT_FOUND).build();
        }
    }

    @POST
    public Response createEvent( @Valid Event event, @Context UriInfo uriInfo) {
        event = service.persistEvent(event);
        UriBuilder builder = uriInfo.getAbsolutePathBuilder().path( event.getId().toString() );
        URI location = builder.build();
        return Response.created(location).build();
    }

    @PUT
    public Response updateEvent( @Valid Event event ) {
        event = service.updateEvent(event);
        return Response.ok(event).build();
    }

    @DELETE
    @Path("/{id}")
    public Response deleteEvent( @PathParam("id") Long id ) {
        service.deleteEvent(id);
        return Response.noContent().build();
    }

    @PUT
    @Path("/reserve/{id}/{amount}")
    public Response reserve( @PathParam("id") Long id, @PathParam("amount") Long amount ) {

        Optional<Event> event = service.getEventById(id);
        if (!event.isPresent()) {
            LOGGER.debug("No event found with id " + id);
            return Response.status(Status.NOT_FOUND).build();
        }

        if ( event.get().getAvailability().intValue()<=0 ) {
            LOGGER.debug("no availability");
            return Response.status(Status.NOT_FOUND).build();
        }

        Event eventRest = service.reserve(id, amount);
        LOGGER.debug("Event reserved " + eventRest);
        return Response.ok(eventRest).build();
    }

}
The Event class
Is a simple Pojo object that will be used by Jsonb to serialize and deserialize the request and the respones of the Rest service and will be stored by the EventService. It contains all the information of an Event and some annotations that can be used by quarkus-hibernate-validator to validate the bean.
public class Event {

    @Min(0)
    Long id;

    @NotNull
    String title;

    String artist;

    @NotNull
    String description;

    @JsonbDateFormat("dd/MM/yyyy HH:mm:ss")
    LocalDateTime startDate;

    @NotNull
    String where;

    @NotNull
    String address;

    @DecimalMin(value = "0.0", inclusive = true)
    @Digits(integer=3, fraction=2)
    Float price;

    @NotNull
    @Min(0)
    Integer availability;

    String img;

    //default constructor and getter and setter methods
}
The EventService class
The EventService represents the logic of the rest service, it does the dirty job. For this article it was chosen to leave the implementation as simple as possible and to avoid adding the interaction with the database to facilitate understanding of the CDI and REST services. There’s no database and the data will be keep in memory using a simple HashMap. The @ApplicationScoped annotation that tell to Quarkus that can use this bean for CDI.
@ApplicationScoped
public class EventService {

    //local simple database
	private Map<Long, Event> eventMap = new HashMap<Long, Event>();
	private long currentId=1;

	public List<Event> getAllActiveEvents() {
        final LocalDateTime now = LocalDateTime.now();
        List<Event> eventList = eventMap.values().stream()
			.filter( e -> e.getStartDate().isAfter(now) )
			.filter( e -> e.getAvailability() > 0)
            .collect(Collectors.toList());
		return eventList;
	}

	public Optional<Event> getEventById(Long id) {
		return Optional.ofNullable( eventMap.get(id) );
	}

    public @Valid Event persistEvent(@Valid Event event) {
		event.setId(currentId);
		currentId++;
		eventMap.put( event.getId(), event);
		return eventMap.get(event.getId());
	}

	//...
}
Test the EventResource
There are two main method for test an API using Quarkus.
The first is to run the application and invoke the service using “curl command” during live coding:
//get a random event
curl -X GET http://localhost:8081/api/events/random
//answer
HTTP/1.1 200 OK
Content-Length: 385
Content-Type: application/json
connection: close

{
  "address": "12197 Bennie Unions",
  "artist": "Norberto Kris",
  "availability": 127,
  "description": "Distinctio delectus doloremque laborum voluptas nemo. Ipsam sapiente dolorum architecto itaque et. Quibusdam et nostrum eius rerum id. Sunt quibusdam sunt error.",
  "id": 6,
  "img": "img/img_3.jpg",
  "price": 46.01,
  "startDate": "04/01/2021 11:35:37",
  "title": "Norberto Kris in Arena",
  "where": "Leighview"
}

//create resource (POST)
curl -X POST "http://localhost:8081/api/events" -H  "accept: application/json" -H  "Content-Type: application/json" -d '{
  "address": "via Roma 1",
  "artist": "Carmen Consoli",
  "availability": 100,
  "description": "Carmen Consoli torna con un nuovo tour nel 2021!",
  "price": 100,
  "startDate": "01/07/2021 20:00:00",
  "title": "title 1",
  "where": "palasport 1"
}' -v
//answer
HTTP/1.1 201 Created
Content-Length: 0
Location: http://localhost:8081/api/events/11
connection: close
The second way to test the REST API is to develop a JUnit test suite. It will be executed always during during maven builds. Quarkus support JUnit 5 and is very simple to implement tests, define mocks using CDI and verify the the HTTP response. The following example use the library rest-assured:
@QuarkusTest
@TestMethodOrder(MethodOrderer.OrderAnnotation.class)
public class EventResourceTest {

    private static Logger LOGGER = Logger.getLogger(EventResourceTest.class);

    private static int numberOfEvents;
    private static String eventId;

    @Test
    @Order(1)
    public void testBaseEndpoint() {
        List<Event> eventList = new ArrayList<>();
        eventList = given()
          .when().get("/api/events")
          .then()
             .statusCode(OK.getStatusCode())
             .header(HttpHeaders.CONTENT_TYPE, MediaType.APPLICATION_JSON)
             .extract().body().as(getEventTypeRef());

        numberOfEvents=eventList.size();
        LOGGER.debug("numberOfEvents="+numberOfEvents);
    }

    //...
}
The ReservationResource class
The ReservationResource implements all the services related to the “reservation” resource. The source code specify that the service will listen on path “/api/reservation” and use an injected instance of ReservationService class that implements the business logic.
@Path("/api/reservation")
public class ReservationResource {

    @Inject
    ReservationService service;

    @GET
    @Path("/{id}")
    public Response getReservation(@PathParam("id") Long id) {
        Optional<Reservation> event = service.getReservationById(id);
        if (event.isPresent()) {
            return Response.ok(event).build();
        } else {
            return Response.status(Status.NOT_FOUND).build();
        }

    }

    @POST
    public Response createReservation(@Valid CreateReservationIn req, @Context UriInfo uriInfo) {
        try {
            CreateReservationOut resp = service.createReservation(req);
            UriBuilder builder = uriInfo.getAbsolutePathBuilder().path(resp.getId().toString());
            URI location = builder.build();
            return Response.created(location).entity(resp).build();
        } catch (EventNotFoundException e) {
            return Response.status(Status.NOT_FOUND).build();
        } catch (Exception e) {
            return Response.status(Status.INTERNAL_SERVER_ERROR).build();
        }
    }
}
The ReservationService class
The ReservationService implements the logic of the reservation and it have a dipendency on EventResource. For this reason, it needs to inject an instance of EventsProxy to use as rest client of event resource.
@ApplicationScoped
public class ReservationService {
    //local simple database
    private Map<Long, Reservation> reservationMap = new HashMap<Long, Reservation>();
    private long currentId = 1;

    @Inject
    @RestClient
    EventsProxy eventClient;

	public Optional<Reservation> getReservationById(Long id) {
		return Optional.ofNullable( reservationMap.get(id) );
	}

	public @Valid CreateReservationOut createReservation(@Valid CreateReservationIn req) {
        //call event service
		Event e = eventClient.getEvent(req.getEventId());

        Reservation reservation = new Reservation();
        reservation.setId( currentId );
        currentId++;
        reservation.setEventId( e.getId() );
        reservation.setUserId( req.getUserId() );
        reservation.setSecureCode( generateSecureCode() );
        reservation.setDate( LocalDateTime.now() );
        //persist
        reservationMap.put( reservation.getId() , reservation);

        //call event service for event reservation, and availability decrement
        eventClient.reserve( e.getId(), 1L);

        CreateReservationOut resp = new CreateReservationOut();
        resp.setId( reservation.getId() );
        resp.setEventId( reservation.getEventId() );
        resp.setUserId( reservation.getUserId() );
        resp.setSecureCode( reservation.getSecureCode() );
        resp.setDate( reservation.getDate() );
        return resp;
	}

    //...
}
The EventsProxy class
The EventsProxy is the rest client of event resource. In Quarkus is very simple to to create a Microprofile rest client using @RegisterRestClient. It need to implement a java interface and uses the same annotations defined in the EventResource class.
@Path("/api/events")
@RegisterProvider(EventsExceptionMapper.class)
@Produces(MediaType.APPLICATION_JSON)
@Consumes("application/json")
@RegisterRestClient
public interface EventsProxy {

    @GET
    @Path("/{id}")
    public Event getEvent( @PathParam("id") Long id);

    @PUT
    @Path("/reserve/{id}/{amount}")
    public Event reserve( @PathParam("id") Long id, @PathParam("amount") Long amount );

}
The starevent-frontend
The starevent-frontend is a web application developed using the Qute extension. Qute is a templating engine that make web development very fast in Quarkus, it provides API that combines both the imperative and the non-blocking reactive style of coding.
The development is very easy, I defined a Resource that maps three http path each one use a different template:
- ”/”: map the index page
- “/moreinfo”: map the more info page
- “/reserve”: map the reservation page.
Every time that a page is requested, the Resource invoke the client and render the result using the template.
@Path("/")
public class IndexResource {

    @Inject Template index;
    @Inject Template moreinfo;
    @Inject Template reserve;

    @Inject
    @RestClient
    EventsProxy eventClient;

    @Inject
    @RestClient
    ReservationProxy reservationClient;

    @GET
    @Produces(MediaType.TEXT_PLAIN)
    public TemplateInstance get() {
        Event randomEvent = eventClient.getRandomEvent();
        List<Event> eventList = eventClient.all();
        return index
                .data("eventList", eventList )
                .data("randomEvent", randomEvent);
    }

    @GET
    @Path("/moreinfo/{id}")
    @Produces(MediaType.TEXT_PLAIN)
    public TemplateInstance moreinfo(@PathParam("id") Long id) {
        Event event = eventClient.getEvent(id);
        return moreinfo.data("event", event );
    }

    @GET
    @Path("/reserve/{id}")
    @Produces(MediaType.TEXT_PLAIN)
    public TemplateInstance reserve(@PathParam("id") Long id) {
        CreateReservationIn req = new CreateReservationIn();
        req.setEventId(id);
        req.setUserId("example.user@userworld.com");
        CreateReservationOut reservationOut = reservationClient.createReservation(req);
        Event event = eventClient.getEvent(reservationOut.getEventId());
        return reserve.data("reservationOut", reservationOut ).data("event", event );
    }

}
If we open a browser and visit http://127.0.0.1:8080 we will see the frontend application, we can view all the availabe events, discover details and reserve a ticket:
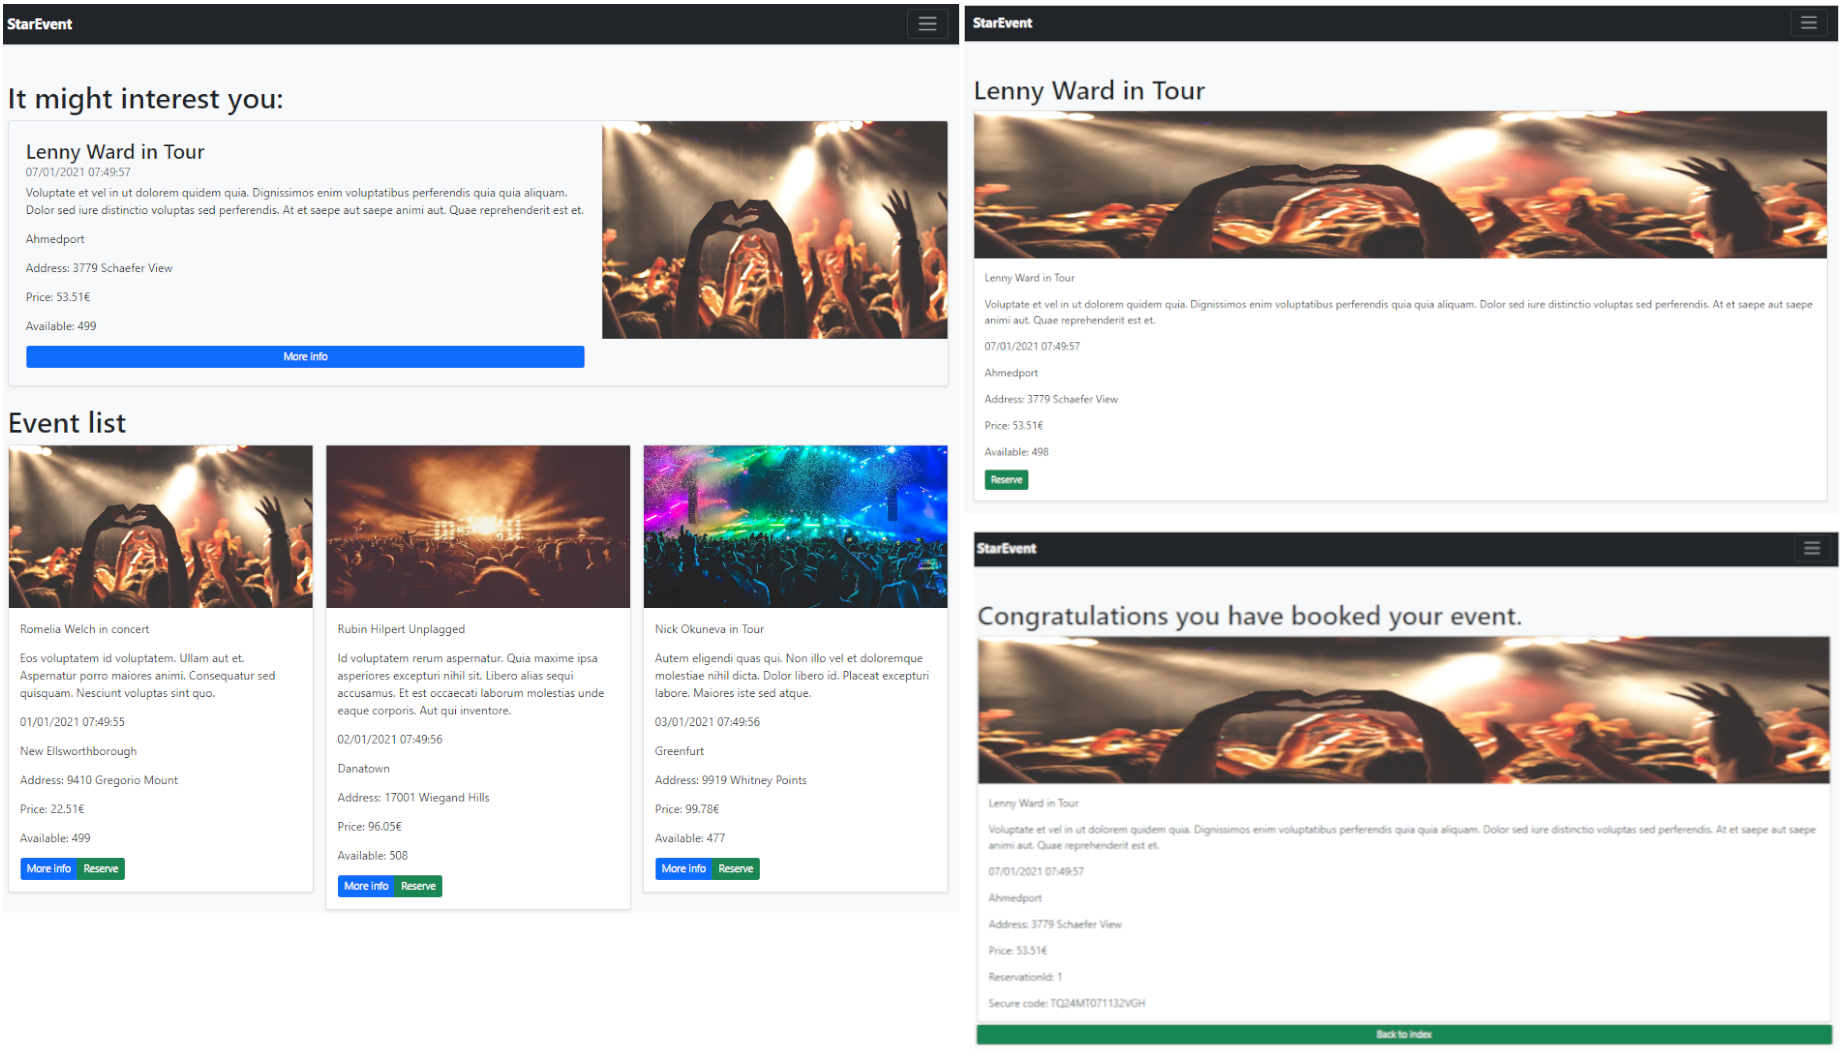
Now that the development is completed we can think on how to run the entire application in an environment ready for production.
DOCKER BUILDS
When we created the projects with io.quarkus:quarkus-maven-plugin, Maven created automatically the folder “/src/main/docker” that contains three files:
- Dockerfile.jvm: builds a container that runs the Quarkus application in JVM mode
- Dockerfile.fast-jar: builds a container that runs the Quarkus application in JVM mode with some optimizations for faster boot
- Dockerfile.native: builds a container that runs the Quarkus application in native (no JVM) mode.
You can execute manually this dockerfiles choosing the preferred version.
An alternative way to build the images is to use the Quarkus “container-image-docker” extension. We need to add inside our pom the extension dependency:
<dependency>
    <groupId>io.quarkus</groupId>
    <artifactId>quarkus-container-image-docker</artifactId>
</dependency>
If you want to choose the package type, you can set the property inside the application.properties. If not defined, by default the value is “jar”.
# Possible values are jar, fast-jar, uber-jar and native
quarkus.package.type=fast-jar
To be sure of image group and tag to use we should define it inside application.properties otherwise by default the created image will have the os user as group and the pom version as tag.
#docker image build
quarkus.container-image.group=rmarcello
quarkus.container-image.tag=1.0-rest
Now we are ready, we can launch the maven build:
mvn package -Dquarkus.container-image.build=trueRepeating this command for each project you should see the images:
docker images
REPOSITORY                           TAG          IMAGE ID       CREATED         SIZE
rmarcello/starevent-reservation      1.0-rest     82817d866450   42 hours ago    333MB
rmarcello/starevent-frontend         1.0-rest     fed5a9b0675c   42 hours ago    329MB
rmarcello/starevent-event            1.0-rest     7a5c3ea832b7   42 hours ago    333MB
This means that our images are ready and we can test everything on Docker!!! Let’s create a docker-compose.yaml:
version: "3"
services:
  starevent-event:
    image: "rmarcello/starevent-event:1.0-rest"
    container_name: "starevent-event"
    ports:
      - "8081:8081"
  starevent-reservation:
    image: "rmarcello/starevent-reservation:1.0-rest"
    container_name: "starevent-reservation"
    ports:
      - "8082:8082"
    environment:
      - COM_RMARCELLO_STAREVENT_CLIENT_EVENTSPROXY_MP_REST_URL=http://starevent-event:8081
    depends_on:
      - starevent-event
  starevent-frontend:
    image: "rmarcello/starevent-frontend:1.0-rest"
    container_name: "starevent-frontend"
    ports:
      - "8080:8080"
    depends_on:
      - starevent-event
      - starevent-reservation
    environment:
      - COM_RMARCELLO_STAREVENT_CLIENT_EVENT_EVENTSPROXY_MP_REST_URL=http://starevent-event:8081
      - COM_RMARCELLO_STAREVENT_CLIENT_RESERVATION_RESERVATIONPROXY_MP_REST_URL=http://starevent-reservation:8082
Notice the definition of three services, for each one the image, the port mapping, the dependency (useful for start order) and the environment variables for REST Clients.
From the same folder of the yaml file, start docker compose:
docker-compose -f docker-compose.yaml up -dAfter few seconds the images are up, infact my docker says that is all up and running:
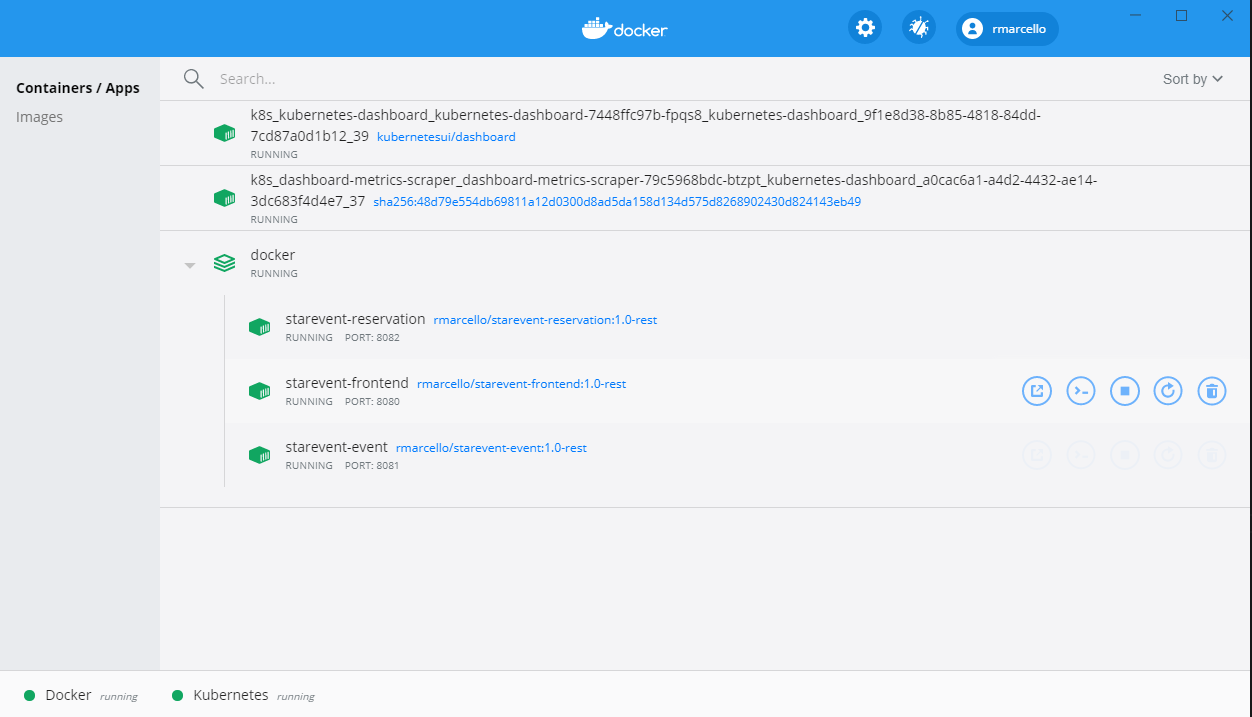
We can do our test and when we finish we stop everything, we can stop everything
docker-compose -f docker-compose.yaml downFinally can be usefull when we need to deploy this application non-locally for example on a Kubernetes cluster, to push the image to the docker registry:
clean package -Dquarkus.container-image.push=trueI already did it:

This means that you can launch directly the docker compose file inside a configured docker environment to test the application. If you don’t have a Docker installed I suggest you to try PLAY WITH DOCKER, copy the docker compose and try it.
KUBERNETES BUILD
As promised, we will deploy this application on Kubernetes. As developers, typically we need to write long and difficult yaml descriptors. However it is very simple using the Kubernetes Quarkus extension. First of all let’s add this dependency inside the pom of each maven project.
<dependency>
    <groupId>io.quarkus</groupId>
    <artifactId>quarkus-kubernetes</artifactId>
</dependency>
By adding these dependencies, Quarkus will automatically generate Kubernetes manifests (in yaml and json format) each time we perform a build in the target/kubernetes/ directory. This will generate three “kubernetes.yml” files that we can use as template for our deployment. Each generated yaml file have a deployment and a service object. We can start from that file, add or modify some informations as we like, for example we can add some labels or annotations and don’t forget to setup the environment variable that we must specify to configure the rest clients.
The following is my application.yaml file:
---
#starevent-event
apiVersion: v1
kind: Service
metadata:
  annotations:
    app.quarkus.io/vcs-url: https://github.com/marcelloraffaele/starevent-quarkus.git
    app.quarkus.io/build-timestamp: 2021-01-02 - 16:59:21 +0000
    app.quarkus.io/commit-id: f9e7c56ee0ba304b94271d688438356f61a11a18
  labels:
    app.kubernetes.io/name: starevent-event
    app.kubernetes.io/version: 1.0-rest
  name: starevent-event
spec:
  ports:
  - name: http
    port: 8081
    targetPort: 8081
  selector:
    app.kubernetes.io/name: starevent-event
    app.kubernetes.io/version: 1.0-rest
  type: ClusterIP
---
apiVersion: apps/v1
kind: Deployment
metadata:
  annotations:
    app.quarkus.io/vcs-url: https://github.com/marcelloraffaele/starevent-quarkus.git
    app.quarkus.io/build-timestamp: 2021-01-02 - 16:59:21 +0000
    app.quarkus.io/commit-id: f9e7c56ee0ba304b94271d688438356f61a11a18
  labels:
    app.kubernetes.io/version: 1.0-rest
    app.kubernetes.io/name: starevent-event
  name: starevent-event
spec:
  replicas: 1
  selector:
    matchLabels:
      app.kubernetes.io/version: 1.0-rest
      app.kubernetes.io/name: starevent-event
  template:
    metadata:
      annotations:
        app.quarkus.io/vcs-url: https://github.com/marcelloraffaele/starevent-quarkus.git
        app.quarkus.io/build-timestamp: 2021-01-02 - 16:59:21 +0000
        app.quarkus.io/commit-id: f9e7c56ee0ba304b94271d688438356f61a11a18
      labels:
        app.kubernetes.io/version: 1.0-rest
        app.kubernetes.io/name: starevent-event
    spec:
      containers:
      - env:
        - name: KUBERNETES_NAMESPACE
          valueFrom:
            fieldRef:
              fieldPath: metadata.namespace
        image: rmarcello/starevent-event:1.0-rest
        imagePullPolicy: Always
        name: starevent-event
        ports:
        - containerPort: 8081
          name: http
          protocol: TCP
---
#starevent-reservation
apiVersion: v1
kind: Service
metadata:
  annotations:
    app.quarkus.io/vcs-url: https://github.com/marcelloraffaele/starevent-quarkus.git
    app.quarkus.io/build-timestamp: 2021-01-02 - 12:25:12 +0000
    app.quarkus.io/commit-id: f9e7c56ee0ba304b94271d688438356f61a11a18
  labels:
    app.kubernetes.io/name: starevent-reservation
    app.kubernetes.io/version: 1.0-rest
  name: starevent-reservation
spec:
  ports:
  - name: http
    port: 8082
    targetPort: 8082
  selector:
    app.kubernetes.io/name: starevent-reservation
    app.kubernetes.io/version: 1.0-rest
  type: ClusterIP
---
apiVersion: apps/v1
kind: Deployment
metadata:
  annotations:
    app.quarkus.io/vcs-url: https://github.com/marcelloraffaele/starevent-quarkus.git
    app.quarkus.io/build-timestamp: 2021-01-02 - 12:25:12 +0000
    app.quarkus.io/commit-id: f9e7c56ee0ba304b94271d688438356f61a11a18
  labels:
    app.kubernetes.io/name: starevent-reservation
    app.kubernetes.io/version: 1.0-rest
  name: starevent-reservation
spec:
  replicas: 1
  selector:
    matchLabels:
      app.kubernetes.io/name: starevent-reservation
      app.kubernetes.io/version: 1.0-rest
  template:
    metadata:
      annotations:
        app.quarkus.io/vcs-url: https://github.com/marcelloraffaele/starevent-quarkus.git
        app.quarkus.io/build-timestamp: 2021-01-02 - 12:25:12 +0000
        app.quarkus.io/commit-id: f9e7c56ee0ba304b94271d688438356f61a11a18
      labels:
        app.kubernetes.io/name: starevent-reservation
        app.kubernetes.io/version: 1.0-rest
    spec:
      containers:
      - env:
        - name: KUBERNETES_NAMESPACE
          valueFrom:
            fieldRef:
              fieldPath: metadata.namespace
        - name: COM_RMARCELLO_STAREVENT_CLIENT_EVENTSPROXY_MP_REST_URL
          value: http://starevent-event:8081
        image: rmarcello/starevent-reservation:1.0-rest
        imagePullPolicy: Always
        name: starevent-reservation
        ports:
        - containerPort: 8082
          name: http
          protocol: TCP
---
#starevent-frontend
apiVersion: v1
kind: Service
metadata:
  annotations:
    app.quarkus.io/vcs-url: https://github.com/marcelloraffaele/starevent-quarkus.git
    app.quarkus.io/build-timestamp: 2021-01-02 - 16:40:28 +0000
    app.quarkus.io/commit-id: f9e7c56ee0ba304b94271d688438356f61a11a18
  labels:
    app.kubernetes.io/name: starevent-frontend
    app.kubernetes.io/version: 1.0-rest
  name: starevent-frontend
spec:
  ports:
  - name: http
    port: 8080
    targetPort: 8080
  selector:
    app.kubernetes.io/name: starevent-frontend
    app.kubernetes.io/version: 1.0-rest
  type: LoadBalancer
---
apiVersion: apps/v1
kind: Deployment
metadata:
  annotations:
    app.quarkus.io/vcs-url: https://github.com/marcelloraffaele/starevent-quarkus.git
    app.quarkus.io/build-timestamp: 2021-01-02 - 16:40:28 +0000
    app.quarkus.io/commit-id: f9e7c56ee0ba304b94271d688438356f61a11a18
  labels:
    app.kubernetes.io/version: 1.0-rest
    app.kubernetes.io/name: starevent-frontend
  name: starevent-frontend
spec:
  replicas: 1
  selector:
    matchLabels:
      app.kubernetes.io/version: 1.0-rest
      app.kubernetes.io/name: starevent-frontend
  template:
    metadata:
      annotations:
        app.quarkus.io/vcs-url: https://github.com/marcelloraffaele/starevent-quarkus.git
        app.quarkus.io/build-timestamp: 2021-01-02 - 16:40:28 +0000
        app.quarkus.io/commit-id: f9e7c56ee0ba304b94271d688438356f61a11a18
      labels:
        app.kubernetes.io/version: 1.0-rest
        app.kubernetes.io/name: starevent-frontend
    spec:
      containers:
      - env:
        - name: KUBERNETES_NAMESPACE
          valueFrom:
            fieldRef:
              fieldPath: metadata.namespace
        - name: COM_RMARCELLO_STAREVENT_CLIENT_EVENT_EVENTSPROXY_MP_REST_URL
          value: http://starevent-event:8081
        - name: COM_RMARCELLO_STAREVENT_CLIENT_RESERVATION_RESERVATIONPROXY_MP_REST_URL
          value: http://starevent-reservation:8082
        image: rmarcello/starevent-frontend:1.0-rest
        imagePullPolicy: Always
        name: starevent-frontend
        ports:
        - containerPort: 8080
          name: http
          protocol: TCP
Notice the definition of three Deployments and three Services. The service act as Load Balancer for HTTP Clients in this way each deployment can tranparently scale with multiple replica.
Now that we have defined the kubernetes manifest for the entire application, we can apply it to kubernetes:
\starevent-quarkus\kubernetes> kubectl apply -f application.yaml
service/starevent-event created
deployment.apps/starevent-event created
service/starevent-reservation created
deployment.apps/starevent-reservation created
service/starevent-frontend created
deployment.apps/starevent-frontend created

\starevent-quarkus\kubernetes> kubectl get pods
NAME                                     READY   STATUS    RESTARTS   AGE
starevent-event-6d8dd764b9-qmqqh         1/1     Running   0          76s
starevent-frontend-68cdb7b557-h58tj      1/1     Running   0          76s
starevent-reservation-7f4b94b4c7-xws5f   1/1     Running   0          76s

\starevent-quarkus\kubernetes> kubectl get deployments
NAME                    READY   UP-TO-DATE   AVAILABLE   AGE
starevent-event         1/1     1            1           82s
starevent-frontend      1/1     1            1           82s
starevent-reservation   1/1     1            1           82s

\starevent-quarkus\kubernetes> kubectl get services --selector=app.kubernetes.io/name
NAME                    TYPE           CLUSTER-IP       EXTERNAL-IP   PORT(S)          AGE
starevent-event         ClusterIP      10.102.244.190   <none>        8081/TCP         6m53s
starevent-frontend      LoadBalancer   10.98.14.11      localhost     8080:30405/TCP   6m53s
starevent-reservation   ClusterIP      10.96.95.211     <none>        8082/TCP         6m53s
Notice that three pods, three deployments and three services have been created. For the starevent-frontend I modified the type choosing “LoadBalancer” that give me the opportunity to test the frontend application directly from localhost:8080.
When you have finished you can clean it using the following command:
kubectl delete -f application.yamlConclusion
I think Quarkus is a great Java stack to produce Cloud Native application with extreme speed and simplicity. It helps developers to produce cutting-edge solutions quickly. I really appreciated the live coding feature and the existence of the many extensions and plug-ins that solve the most common problems in an elegant way. I really liked the Cloud Native orientation with the possibility to create native builds, optimize the time and memory used and facilitate integration with Docker and Kubernetes.
Resources
If you want to learn more: